


If you’ve never made jam before, stone fruit is the perfect place to start. Naturally high in flavour, these fruits are fleshy, juicy, and possess a bright tang that perfectly balances the sweetness of the sugar to create beautiful, vibrant preserves.
When making stone fruit jam, expect the air to smell like caramelised sugar and sun-ripened peaches, and your pantry shelves will start filling up with glowing jars of red, gold, and amber.
Making jam is one of the oldest “slow living” skills, but it’s surprisingly fast to learn. If you’ve got a big pot, some sugar, and a bowl of summer fruit, you’re already halfway there.
The Beginner’s Toolkit
You don’t need fancy equipment to start your first batch:
-
A Heavy-Based Pot: A large stainless-steel pot is best. You want it much bigger than the volume of your fruit, as jam “climbs” the walls of the pot when it’s at a rolling boil.
-
Wooden Spoon: The classic tool for a reason, it doesn’t conduct heat!
-
A Cold Saucer: Put a few small plates in the freezer before you start. These are your “set testers.”
What stone fruit to choose:
While you can jam almost anything, each stone fruit brings a different personality to the pot. Here is what you need to know:
- Plums (The Reliable Favourite): Arguably the best choice for beginners. Thanks to their naturally high pectin and acid levels, they set beautifully and easily without the need for store-bought “Jam Sugar.”
- Apricots (The Pantry Staple): These offer a classic, bright flavour. Since they have a moderate pectin level, adding a squeeze of lemon juice is essential to ensure a firm set and to keep that stunning orange colour from fading.
- Nectarines (Sweet & Smooth): These make a lovely, mellow jam. However, because they are lower in acid, they pair perfectly with a little ginger or vanilla bean to add a sophisticated depth of flavour.
- Peaches (Fragrant & Delicate): Peach jam is incredibly aromatic but a bit more “advanced.” Because they are low in pectin, they require a bit more patience (and extra lemon juice!) to reach the perfect setting point.
-
Don’t be afraid to mix and match! If you have a few stray peaches and a handful of plums, a “Summer Stone Fruit Medley” is a delicious combination.
-
-
Plum + Nectarine: The plum helps the set, and the nectarine provides the sweetness.
-
Peach + Raspberry: A classic “Peach Melba” style that is so delicious.
-
The Essentials
-
The Fruit: Choose fruit that is ripe but still firm. Over-ripe fruit loses the natural acidity needed to help the jam “set” properly.
-
The Sugar: Sugar isn’t just for sweetness; it is the vital preservative that makes your jam shelf-stable and gives it that glossy finish.
-
The Acid: Stone fruits (especially peaches) love a squeeze of Lemon Juice. This extra boost of acid helps the natural pectin in the fruit do its job, ensuring a firm, jammy texture.
Ingredients:
For a reliable set and a shelf-stable jam, follow this basic formula:
-
Fruit: 1kg of prepared fruit (stoned and chopped).
-
Sugar: 750g to 1kg of white sugar.
-
Note: Using 1:1 (1kg sugar to 1kg fruit) is the traditional way and gives the firmest set and longest shelf life. If you prefer a slightly fruitier, softer jam, 750g of sugar is a popular modern choice.
-
-
Lemon Juice: Juice of 1 large lemon (approx. 2–3 tablespoons).
This will typically give you about 4 to 5 standard-sized (250ml) jars.
The Process
Making jam is a beautiful balance of patience and chemistry. Follow these steps to ensure your jars are safe, clear, and perfectly set.
1. Sterilise Your Equipment
Safety first! Before you even touch the fruit, wash your jars and lids in hot, soapy water. Place the jars in a 110°C oven for at least 15 minutes.
Important: Always pour hot jam into hot jars. If you pour boiling jam into a cold jar, the glass can shatter!
2. The Prep (Maceration)
Chop your fruit into the size you want to find on your toast, some like it chunky, while others prefer it smooth.
- The Pro Tip: Mix your fruit and sugar in the pot and let it sit for an hour (or even overnight) before turning on the heat. This “maceration” process draws the juice out while keeping the fruit pieces firm and plump.
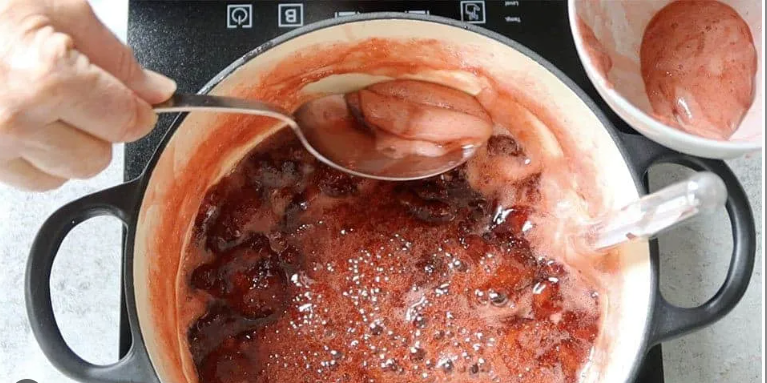
3. The Rolling Boil
Once the sugar has dissolved over low heat, crank it up! You are looking for a “rolling boil”—a vigorous, bubbling state that doesn’t subside when you stir it. This is where the magic happens: the water evaporates and the pectin bonds with the sugar to create that thick, spreadable consistency.
-
Watch the Clock: On average, it takes between 10 and 20 minutes of a rolling boil to reach the setting point. High-pectin fruits like plums set faster, while peaches and nectarines may take a little longer.
-
Don’t Overdo It: Avoid boiling for longer than 25–30 minutes. If you overcook it, the sugar starts to caramelise, turning your jam a dark, dull colour and giving it a “burnt” taste. It is better to test early and often!
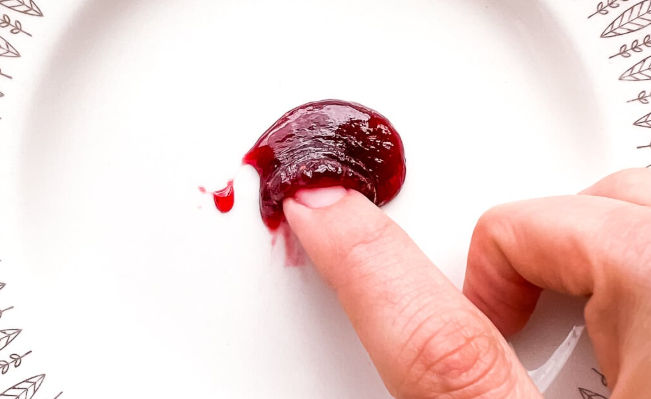
4. The “Wrinkle” Test
How do you know it’s done? After 10 minutes drop a teaspoon of hot jam onto a cold saucer (keep one in the freezer for this!). Wait 30 seconds, then push the jam with your finger. If the surface wrinkles, you’ve reached the setting point! If your finger slides through, boil for another 5 minutes and test again.
5. Skim and Settle
Once you hit the setting point, turn off the heat.
- The Skim: Use a large metal spoon to gently remove any white “scum” or foam from the surface. This ensures your jam is clear and jewel-like.
- The Settle: Let the jam sit in the pot for 5–10 minutes before jarring. This prevents the fruit from floating to the top, ensuring it stays evenly suspended throughout the jar.
6. The Final Seal
Carefully pour the jam into your hot jars, leaving about 1cm of space at the top. Use a clean, damp cloth to wipe any sticky residue off the rim before tightening the lids. As they cool, you’ll hear that satisfying click, the sound of a perfect vacuum seal!
There is nothing quite like the pride of seeing a row of handmade preserves in your pantry. Whether you’re gifting them to friends or saving them for a rainy winter morning, you’ve just captured a little bit of Perth summer to enjoy all year round!
If you can’t make jam the day you get your fruit, stone them and pop them in the freezer. You can actually make great jam from frozen stone fruit later in the year when the weather is cooler.
You must be logged in to post a comment.